
How to Deploy NestJS for Free on MS HOST
Easy, free deployment for NestJS. Connect GitHub, follow this step-by-step guide, and go live in minutes on MS HOST. See also our deployment solution and FAQ for more help.
Deploying NestJS shouldn't be complicated
Setting up servers, configuring build pipelines, and managing environment variables takes time away from building your product. MS HOST gives you a free, developer-first platform to deploy NestJS applications from GitHub in minutes — no DevOps expertise required.
Why deploy NestJS on MS HOST
Easy, free deployment
Connect your GitHub repo, select NestJS, and deploy for free. MS HOST handles builds, hosting, and SSL automatically.
- No credit card required
- One-click GitHub integration
- Automatic HTTPS on every deploy
Built for modern workflows
Every push to your branch triggers an automatic build and deployment. Focus on code while MS HOST keeps your NestJS app live.
- Continuous deployment from Git
- Live build logs in the dashboard
- Zero-downtime redeployments
Production-ready from day one
Environment variables, custom domains, and framework-specific defaults are configured for NestJS out of the box.
- Secure environment variable management
- Framework-optimized build settings
- Instant rollback from the dashboard
Who uses MS HOST for deployment
Teams and solo developers ship NestJS projects faster with free, reliable hosting.
Side projects and MVPs
Launch your NestJS prototype for free and share a live URL with users or investors within minutes.
Production applications
Run real NestJS workloads with automatic redeployments, environment secrets, and a dashboard to monitor every build.
Overview
NestJS is a scalable Node.js framework for building efficient server-side applications. MS HOST provides high-performance free hosting for NestJS APIs with easy configuration. This guide covers repository setup, environment variables, auto-deploy, and production deployment on MS HOST.
Video Tutorial
Setup Requirements
Node.js 18v to 24v
npm, yarn, or pnpm package manager
A NestJS project ready for production
Step-by-Step Deployment
Name Your Project
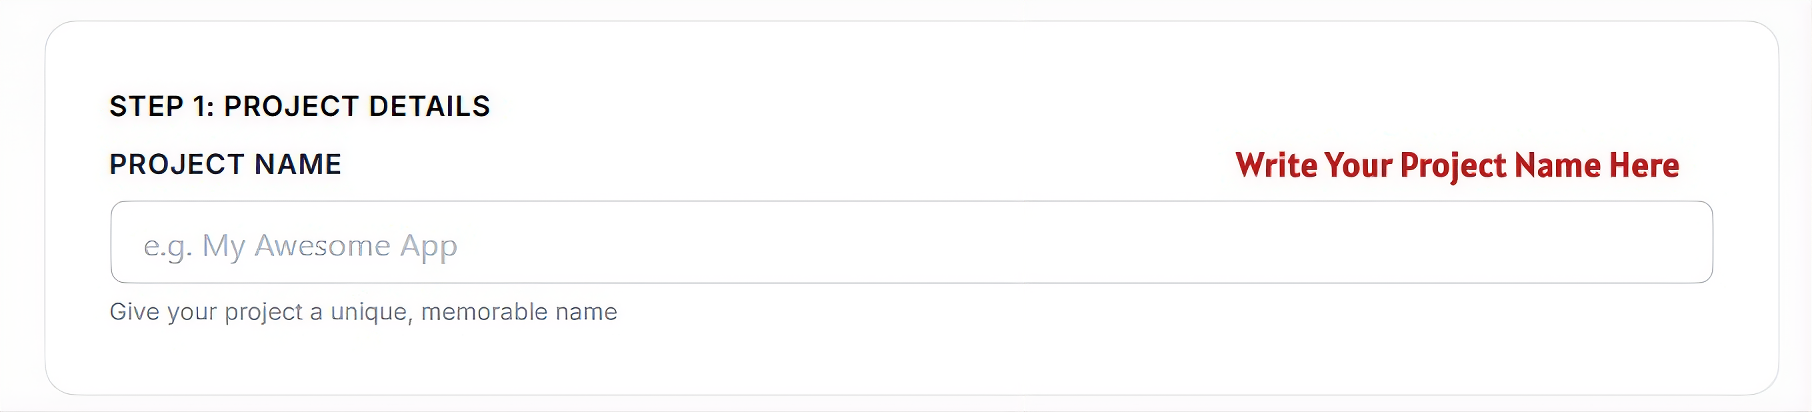
Enter a unique name for your NestJS backend.
Project Name
Choose a name like 'API Service' or 'NestJS Backend'. This is used to identify your project in the system.
The helper text below ensures your project name is unique across the platform.
Connect Repository
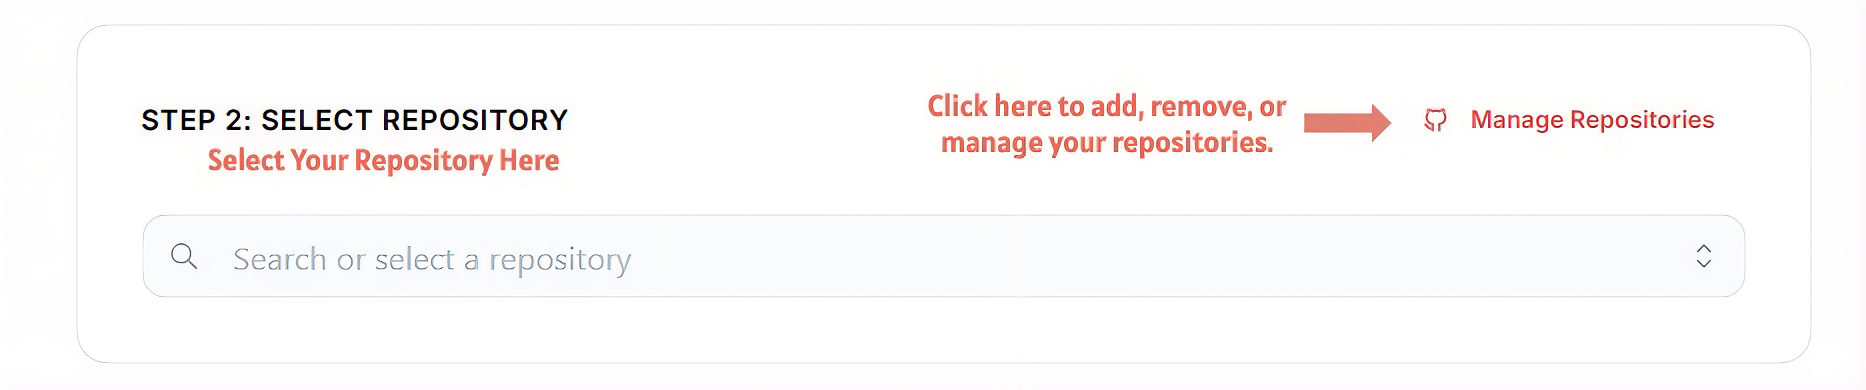
Connect your NestJS backend repository from GitHub.
Search or Select a Repository
Find your NestJS project using the searchable dropdown.
Manage Repositories
authorize MS HOST to access your personal repos if they aren't visible.
Select Framework
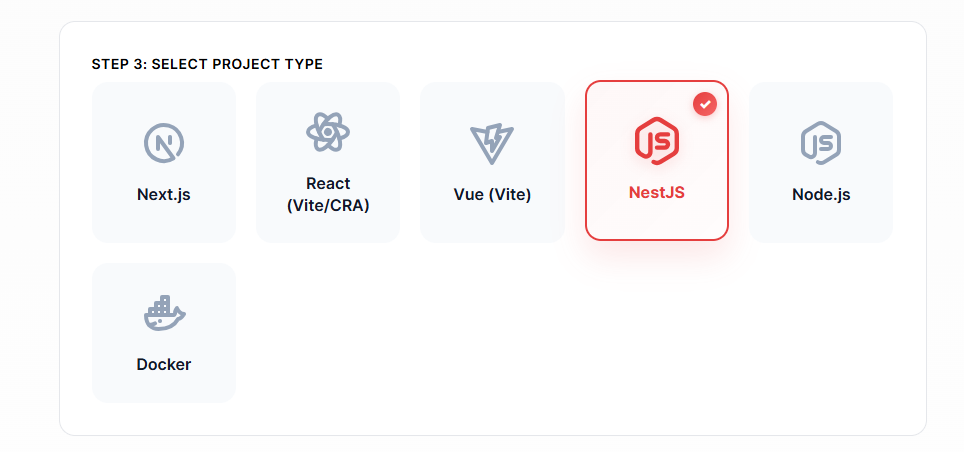
Confirm 'NestJS' as your framework manually.
NestJS
Selecting NestJS helps MS HOST configure the correct build environment for TypeScript compilation and Node.js serving. A checkmark will appear on the card.
Configure & Deploy
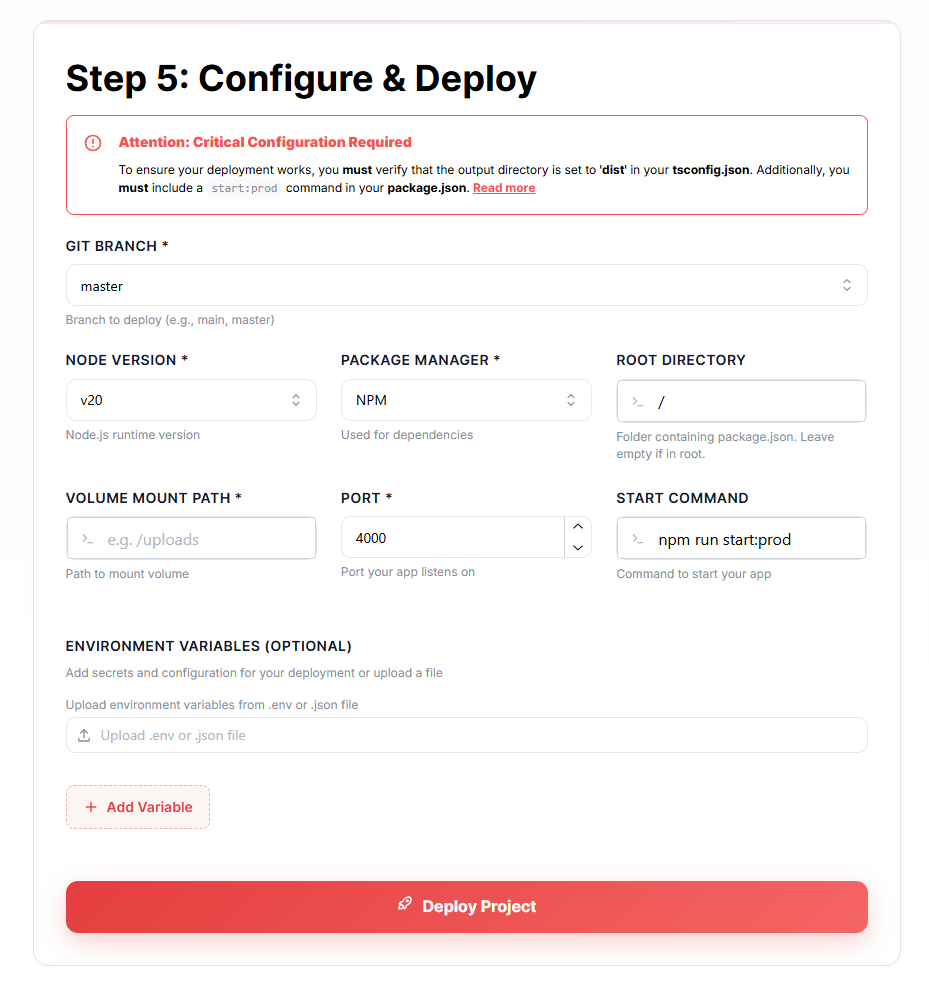
Finalize your NestJS build and runtime settings.
Git Branch
Select your production branch (e.g., 'main'). Push-to-deploy is enabled by default.
Node Version
Choose the Node.js runtime version (e.g., v20). MS HOST recommends the latest LTS version for stability.
Package Manager
Select your package manager: NPM, Yarn, or PNPM. This determines how dependencies are installed during the build.
Root Directory
Specify the folder containing your package.json. Leave as '/' if your project is in the repository root. Useful for monorepo setups.
Port
The port your NestJS app listens on (ensure it matches your app's listening port).
Environment Variables
Add your database URIs, JWT secrets, and other configuration values here. You can manually enter or upload a file.
Deploy Project
Click 'Deploy Project' to launch your NestJS backend. MS HOST handles the TypeScript build and starts your server.
Project Dashboard Guide
Once your project is deployed, you land on the Dashboard. This central control panel provides real-time insights and management tools for your application.
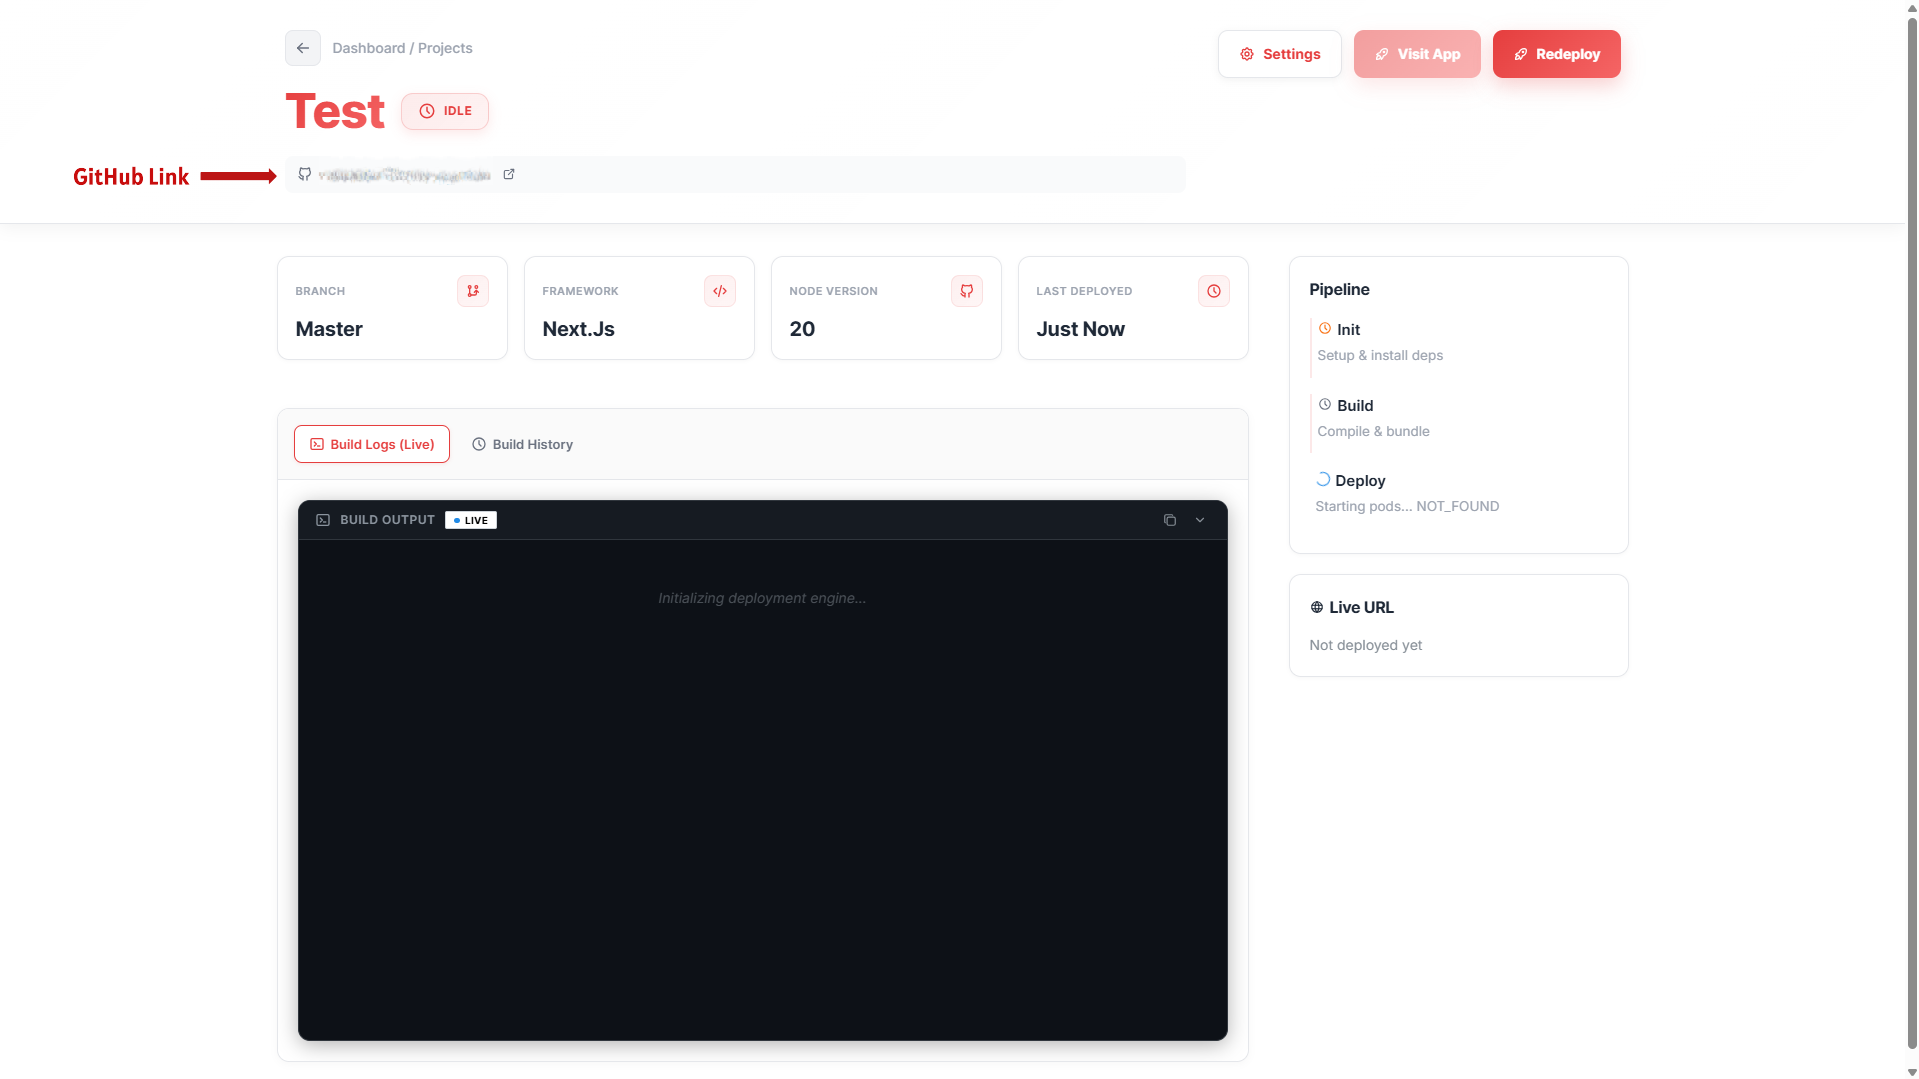
Project Name & Status
Located at the top-left, this displays your globally unique project name along with a real-time status badge (e.g., IDLE, BUILDING, LIVE, or ERROR) indicating the health of your application.
GitHub Link
Quickly access your source code. The dashboard provides a direct link to your connected GitHub repository and the specific branch currently being served.
Info Cards
Four dynamic cards give you a snapshot of your deployment: the active Branch, the selected Framework, the specific Node.js Version, and the precise time of the 'Last Deployed' successful build.
Build Logs (Live)
Watch your deployment in real-time. The integrated terminal streams live logs from our build engine, allowing you to monitor dependency installation and compilation as it happens.
Pipeline Status
Track the three critical stages of your app's journey: Init (setup & env prep), Build (source compilation), and Deploy (final orchestration and launch).
Live URL & Management
Once live, your production URL is displayed prominently. From the dashboard, you can also trigger a manual 'Redeploy' or access deep 'Settings' for advanced configurations.
Environment Variables
Manage your application secrets and configuration values. MS HOST provides a secure way to inject these into your runtime environment.
Secret Management
NestJS backends often require sensitive data (DB URIs, Keys). MS HOST encrypts these securely and they are NOT exposed to any client-side code.
Adding Variables
Use the '+ Add Variable' button in the Configure or Settings screen to add secrets like API keys, database URIs, or internal flags manually.
Bulk Upload
Save time by uploading a `.env` or `.json` file. MS HOST will automatically parse the file and add all variables to your project in one click.
Security First
Never commit your `.env` files to GitHub. MS HOST securely encrypts all stored environment variables and injects them only during the build and runtime.
Automatic Deployment
Every change you push to your branch is automatically built and deployed. Focus on code, while we handle the distribution.
Push to Deploy
Every time you push code to your selected GitHub branch, MS HOST automatically triggers a fresh build and redeploys your application.
Zero Downtime
Our orchestration engine ensures your old version stays live until the new build is 100% healthy, providing a seamless transition with zero downtime.
Manual Redeploy
Need to trigger a build without a code push? Use the 'Redeploy' button on your dashboard to pull the latest code and rebuild immediately.
Updating Project Settings
Your project is not static. You can refine your configuration as your application grows.
Update Configuration
You can change your Node.js version, package manager, or build commands at any time from the 'Settings' tab on your project dashboard.
Project Scaling
As your project grows, you can adjust deployment resources and advanced platform settings from your project dashboard.
Tips & Common Mistakes
Production Build
NestJS requires a build step. Ensure your `package.json` has a `build` script. MS HOST runs this automatically during deployment.
Start Command
For production, use `npm run start:prod`. MS HOST expects your app to be served from the `dist/` folder after compilation.
Port Configuration
Make sure your `main.ts` uses `process.env.PORT` to listen on the correct port assigned by MS HOST: `await app.listen(process.env.PORT || 3000);`.
Environment Variables
Use a config service within NestJS to manage variables securely. MS HOST handles the injection of these variables at runtime.
Monorepos
If your NestJS app is part of a monorepo, set the 'Root Directory' to the specific folder to ensure the build engine targets the correct `package.json`.
Ready to deploy your NestJS app?
Join developers using MS HOST for free, easy deployment. Connect GitHub and go live today.